Audio
Deprecation of the technologies described here has been announced for platforms other than ChromeOS.
Please visit our migration guide for details.
This section describes how to use the Pepper audio API to play an audio stream. The Pepper audio API provides a low-level means of playing a stream of audio samples generated by a Native Client module. The API generally works as follows: A Native Client module creates an audio resource that represents an audio stream, and tells the browser to start or stop playing the audio resource. The browser calls a function in the Native Client module to fill a buffer with audio samples every time it needs data to play from the audio stream.
The code examples in this section describe a simple Native Client module that generates audio samples using a sine wave with a frequency of 440 Hz. The module starts playing the audio samples as soon as it is loaded into the browser. For a slightly more sophisticated example, see the audio example (source code in the SDK directory examples/api/audio), which lets users specify a frequency for the sine wave and click buttons to start and stop audio playback.
Reference information
For reference information related to the Pepper audio API, see the following documentation:
About the Pepper audio API
The Pepper audio API lets Native Client modules play audio streams in a browser. To play an audio stream, a module generates audio samples and writes them into a buffer. The browser reads the audio samples from the buffer and plays them using an audio device on the client computer.

This mechanism is simple but low-level. If you want to play plain sound files in a web application, you may want to consider higher-level alternatives such as using the HTML <audio> tag, JavaScript, or the new Web Audio API.
The Pepper audio API is a good option for playing audio data if you want to do audio processing in your web application. You might use the audio API, for example, if you want to apply audio effects to sounds, synthesize your own sounds, or do any other type of CPU-intensive processing of audio samples. Another likely use case is gaming applications: you might use a gaming library to process audio data, and then simply use the audio API to output the processed data.
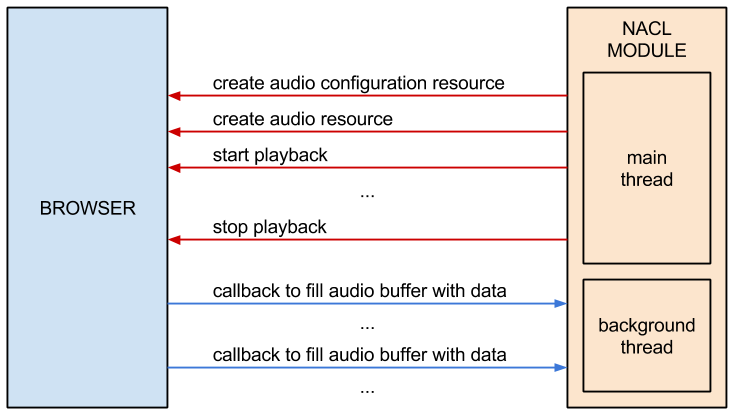
The Pepper audio API is straightforward to use:
- Your module creates an audio configuration resource and an audio resource.
- Your module implements a callback function that fills an audio buffer with data.
- Your module invokes the StartPlayback and StopPlayback methods of the audio resource (e.g., when certain events occur).
- The browser invokes your callback function whenever it needs audio data to play. Your callback function can generate the audio data in a number of ways—e.g., it can generate new data, or it can copy pre-mixed data into the audio buffer.
This basic interaction is illustrated below, and described in detail in the sections that follow.
Digital audio concepts
Before you use the Pepper audio API, it’s helpful to understand a few concepts that are fundamental to how digital audio is recorded and played back:
- sample rate
- the number of times an input sound source is sampled per second; correspondingly, the number of samples that are played back per second
- bit depth
- the number of bits used to represent a sample
- channels
- the number of input sources recorded in each sampling interval; correspondingly, the number of outputs that are played back simultaneously (typically using different speakers)
The higher the sample rate and bit depth used to record a sound wave, the more accurately the sound wave can be reproduced, since it will have been sampled more frequently and stored using a higher level of quantization. Common sampling rates include 44,100 Hz (44,100 samples/second, the sample rate used on CDs), and 48,000 Hz (the sample rate used on DVDs and Digital Audio Tapes). A common bit depth is 16 bits per sample, and a common number of channels is 2 (left and right channels for stereo sound).
The Pepper audio API currently lets Native Client modules play audio streams with the following configurations:
- sample rate: 44,100 Hz or 48,000 Hz
- bit depth: 16
- channels: 2 (stereo)
Setting up the module
The code examples below describe a simple Native Client module that generates audio samples using a sine wave with a frequency of 440 Hz. The module starts playing the audio samples as soon as it is loaded into the browser.
The Native Client module is set up by implementing subclasses of the pp::Module and pp::Instance classes, as normal.
class SineSynthInstance : public pp::Instance {
 public:
  explicit SineSynthInstance(PP_Instance instance);
  virtual ~SineSynthInstance() {}

  // Called by the browser once the NaCl module is loaded and ready to
  // initialize.  Creates a Pepper audio context and initializes it. Returns
  // true on success.  Returning false causes the NaCl module to be deleted
  // and no other functions to be called.
  virtual bool Init(uint32_t argc, const char* argn[], const char* argv[]);

 private:
  // Function called by the browser when it needs more audio samples.
  static void SineWaveCallback(void* samples,
                               uint32_t buffer_size,
                               void* data);

  // Audio resource.
  pp::Audio audio_;

  ...

};

class SineSynthModule : public pp::Module {
 public:
  SineSynthModule() : pp::Module() {}
  ~SineSynthModule() {}

  // Create and return a SineSynthInstance object.
  virtual pp::Instance* CreateInstance(PP_Instance instance) {
    return new SineSynthInstance(instance);
  }
};
Creating an audio configuration resource
Resources
Before the module can play an audio stream, it must create two resources: an audio configuration resource and an audio resource. Resources are handles to objects that the browser provides to module instances. An audio resource is an object that represents the state of an audio stream, including whether the stream is paused or being played back, and which callback function to invoke when the samples in the stream’s buffer run out. An audio configuration resource is an object that stores configuration data for an audio resource, including the sampling frequency of the audio samples, and the number of samples that the callback function must provide when the browser invokes it.
Sample frame count
Prior to creating an audio configuration resource, the module should call RecommendSampleFrameCount to obtain a sample frame count from the browser. The sample frame count is the number of samples that the callback function must provide per channel each time the browser invokes the callback function. For example, if the sample frame count is 4096 for a stereo audio stream, the callback function must provide a 8192 samples (4096 for the left channel and 4096 for the right channel).
The module can request a specific sample frame count, but the browser may return a different sample frame count depending on the capabilities of the client device. At present, RecommendSampleFrameCount simply bound-checks the requested sample frame count (see include/ppapi/c/ppb_audio_config.h for the minimum and maximum sample frame counts, currently 64 and 32768). In the future, RecommendSampleFrameCount may perform a more sophisticated calculation, particularly if there is an intrinsic buffer size for the client device.
Selecting a sample frame count for an audio stream involves a tradeoff between latency and CPU usage. If you want your module to have short audio latency so that it can rapidly change what’s playing in the audio stream, you should request a small sample frame count. That could be useful in gaming applications, for example, where sounds have to change frequently in response to game action. However, a small sample frame count results in higher CPU usage, since the browser must invoke the callback function frequently to refill the audio buffer. Conversely, a large sample frame count results in higher latency but lower CPU usage. You should request a large sample frame count if your module will play long, uninterrupted audio segments.
Supported audio configurations
After the module obtains a sample frame count, it can create an audio configuration resource. Currently the Pepper audio API supports audio streams with the configuration settings shown above. C++ modules can create a configuration resource by instantiating a pp::AudioConfig object. Check audio_config.h for the latest configurations that are supported.
bool SineSynthInstance::Init(uint32_t argc,
                             const char* argn[],
                             const char* argv[]) {

  // Ask the browser/device for an appropriate sample frame count size.
  sample_frame_count_ =
      pp::AudioConfig::RecommendSampleFrameCount(PP_AUDIOSAMPLERATE_44100,
                                                 kSampleFrameCount);

  // Create an audio configuration resource.
  pp::AudioConfig audio_config = pp::AudioConfig(this,
                                                 PP_AUDIOSAMPLERATE_44100,
                                                 sample_frame_count_);

  // Create an audio resource.
  audio_ = pp::Audio(this,
                     audio_config,
                     SineWaveCallback,
                     this);

  // Start playback when the module instance is initialized.
  return audio_.StartPlayback();
}
Creating an audio resource
Once the module has created an audio configuration resource, it can create an audio resource. To do so, it instantiates a pp::Audio object, passing in a pointer to the module instance, the audio configuration resource, a callback function, and a pointer to user data (data that is used in the callback function). See the example above.
Implementing a callback function
The browser calls the callback function associated with an audio resource every time it needs more samples to play. The callback function can generate new samples (e.g., by applying sound effects), or copy pre-mixed samples into the audio buffer. The example below generates new samples by computing values of a sine wave.
The last parameter passed to the callback function is generic user data that the function can use in processing samples. In the example below, the user data is a pointer to the module instance, which includes member variables sample_frame_count_ (the sample frame count obtained from the browser) and theta_ (the last angle that was used to compute a sine value in the previous callback; this lets the function generate a smooth sine wave by starting at that angle plus a small delta).
class SineSynthInstance : public pp::Instance {
 public:
  ...

 private:
  static void SineWaveCallback(void* samples,
                               uint32_t buffer_size,
                               void* data) {

    // The user data in this example is a pointer to the module instance.
    SineSynthInstance* sine_synth_instance =
        reinterpret_cast<SineSynthInstance*>(data);

    // Delta by which to increase theta_ for each sample.
    const double delta = kTwoPi * kFrequency / PP_AUDIOSAMPLERATE_44100;
    // Amount by which to scale up the computed sine value.
    const int16_t max_int16 = std::numeric_limits<int16_t>::max();

    int16_t* buff = reinterpret_cast<int16_t*>(samples);

    // Make sure we can't write outside the buffer.
    assert(buffer_size >= (sizeof(*buff) * kChannels *
                           sine_synth_instance->sample_frame_count_));

    for (size_t sample_i = 0;
         sample_i < sine_synth_instance->sample_frame_count_;
         ++sample_i, sine_synth_instance->theta_ += delta) {

      // Keep theta_ from going beyond 2*Pi.
      if (sine_synth_instance->theta_ > kTwoPi) {
        sine_synth_instance->theta_ -= kTwoPi;
      }

      // Compute the sine value for the current theta_, scale it up,
      // and write it into the buffer once for each channel.
      double sin_value(std::sin(sine_synth_instance->theta_));
      int16_t scaled_value = static_cast<int16_t>(sin_value * max_int16);
      for (size_t channel = 0; channel < kChannels; ++channel) {
        *buff++ = scaled_value;
      }
    }
  }

  ...
};
Application threads and real-time requirements
The callback function runs in a background application thread. This allows audio processing to continue even when the application is busy doing something else. If the main application thread and the callback thread access the same data, you may be tempted to use a lock to control access to that data. You should avoid the use of locks in the callback thread, however, as attempting to acquire a lock may cause the thread to get swapped out, resulting in audio dropouts.
In general, you must program the callback thread carefully, as the Pepper audio API is a very low level API that needs to meet hard real-time requirements. If the callback thread spends too much time processing, it can easily miss the real-time deadline, resulting in audio dropouts. One way the callback thread can miss the deadline is by taking too much time doing computation. Another way the callback thread can miss the deadline is by executing a function call that swaps out the callback thread. Unfortunately, such function calls include just about all C Run-Time (CRT) library calls and Pepper API calls. The callback thread should therefore avoid calls to malloc, gettimeofday, mutex, condvars, critical sections, and so forth; any such calls could attempt to take a lock and swap out the callback thread, which would be disastrous for audio playback. Similarly, the callback thread should avoid Pepper API calls. Audio dropouts due to thread swapping can be very rare and very hard to track down and debug—it’s best to avoid making system/Pepper calls in the first place. In short, the audio (callback) thread should use “lock-free” techniques and avoid making CRT library calls.
One other issue to be aware of is that the StartPlayback function (discussed below) is an asynchronous RPC; i.e., it does not block. That means that the callback function may not be called immediately after the call to StartPlayback. If it’s important to synchronize the callback thread with another thread so that the audio stream starts playing simultaneously with another action in your application, you must handle such synchronization manually.
Starting and stopping playback
To start and stop audio playback, the module simply reacts to JavaScript messages.
const char* const kPlaySoundId = "playSound";
const char* const kStopSoundId = "stopSound";

void SineSynthInstance::HandleMessage(const pp::Var& var_message) {
  if (!var_message.is_string()) {
    return;
  }
  std::string message = var_message.AsString();
  if (message == kPlaySoundId) {
    audio_.StartPlayback();
  } else if (message == kStopSoundId) {
    audio_.StopPlayback();
  } else if (...) {
    ...
  }
}